User Guide
This guide covers everything from your first boot to power-user territory.
Table of contents
Overview
Here is an overview of the parts of the Wayfinder you will be interacting with:
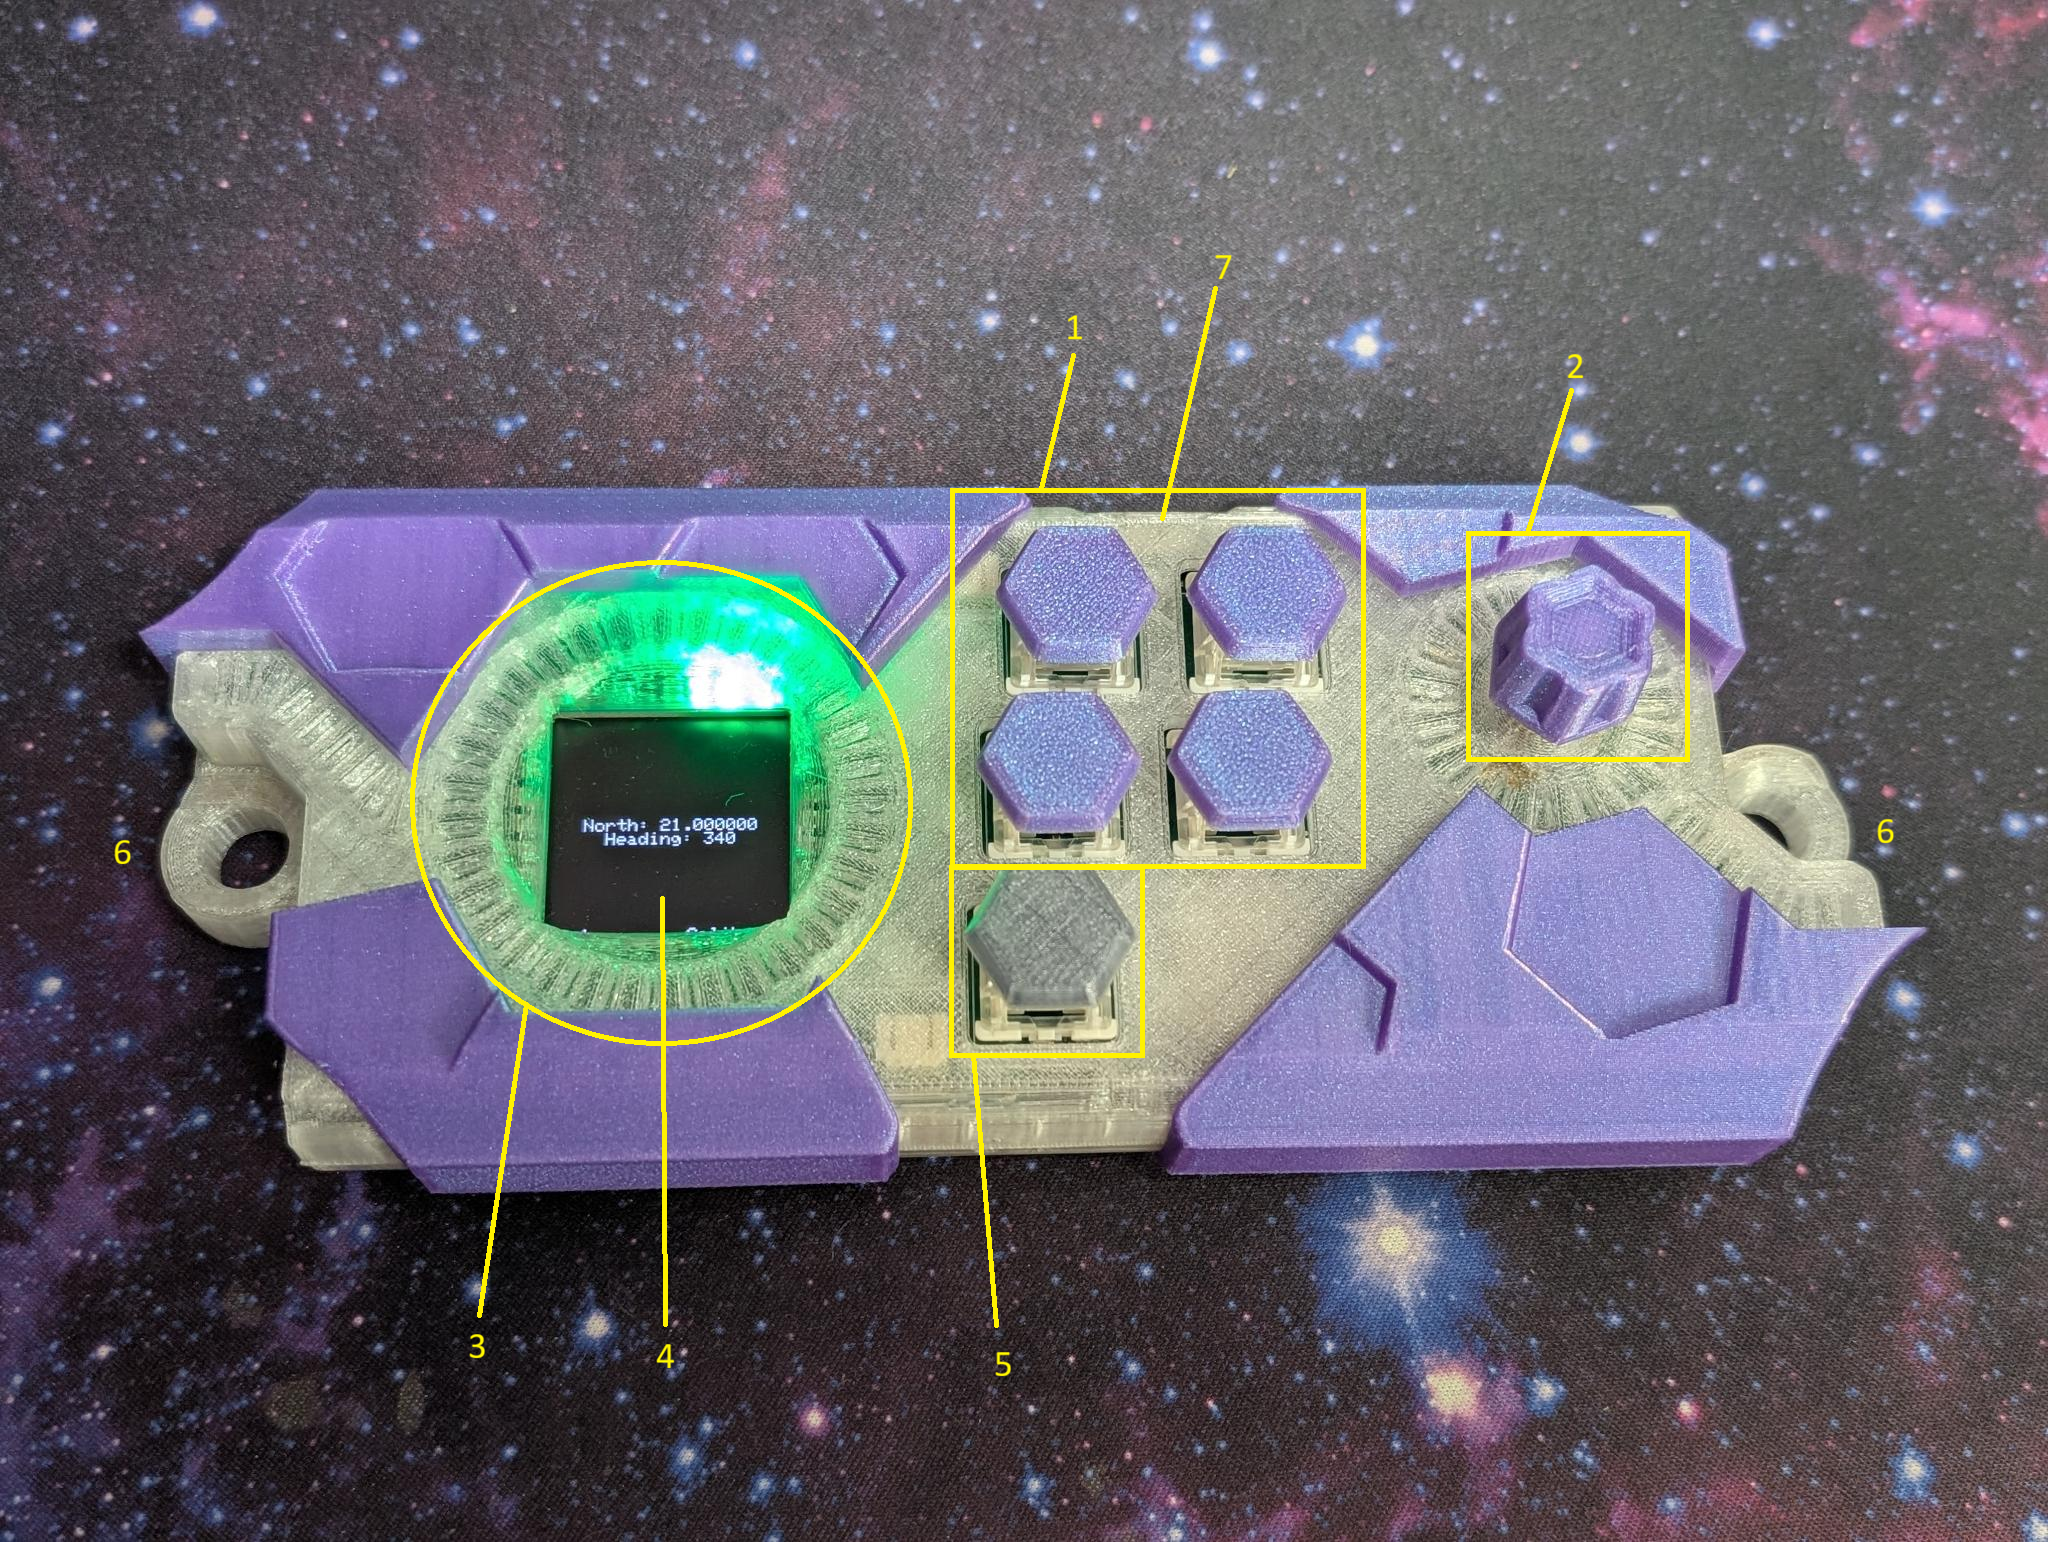
- The primary input buttons. Their actions correspond to the text in the respective corner of the OLED. The buttons are numbered 1-4 from left-to-right top-to-bottom.
- The encoder knob. Used to scroll through the UI. The knob itself can be pressed as a button in certain circumstances.
- The compass ring. Provides an intuitive interface for the onboard compass.
- A 128x128 OLED display
- The power button. Holding for 5 seconds will turn the device on. Holding for 15 seconds will force a reboot.
- Two carabiner/lanyard mounting points.
- (Out of view) USB-C port for both data and charging. This port provides a serial connection to the configuration app.
Home Window
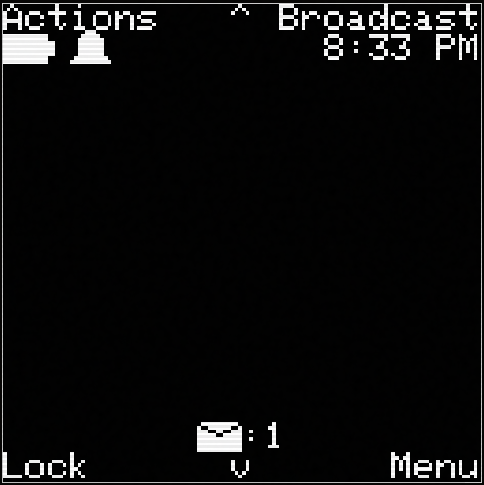
The Home Window is the main point of interaction with the LoRa network. At a glance, you can see your battery life, the current state of silent mode, the current time, and the number of unacknowledged messages. From here you can also begin to broadcast a message, access the quick actions menu, access the main menu, lock the device, view your last ping, and scroll through received messages. See Main Menu below for what’s there.
Broadcast
Pressing button 2 will prompt you to select a location
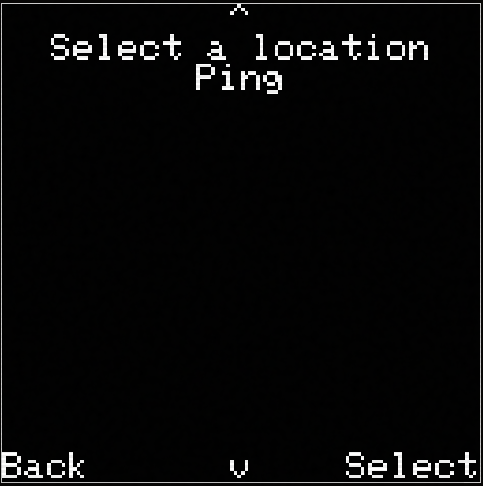
The default is your current location. More locations can be saved from pings received, the quick action menu, or downloaded onto the device from the configuration app.
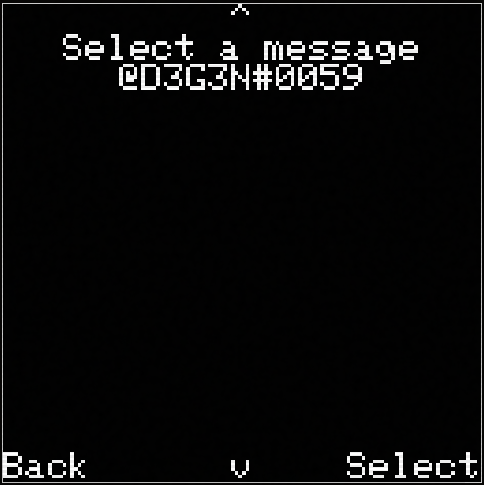
Next, you will select a message. The name of the location selected will always be passed in as a message option. You also have the option of selecting any of your saved messages or tagging any of the last 32 people you have received a broadcast from. Similarly to saved locations, you can saved new messages from pings received, the quick action menu, or downloaded onto the device from the configuration app.
The message will send once the message is selected. See LoRa: Channels & Passwords for more information on frequencies and encryption.
Actions
The action menu contains useful shortcuts
Create Status Message
Opens a text editor to create a new status message
Save Current Location
Saves your current location and opens a text editor to select a name
Toggle Silent Mode
Toggles silent mode; preventing the buzzer and haptics from firing upon receiving a new message
Shutdown
Shuts down the device
Lock
Locking the device clears the OLED, enables some power saving measures, and awaits a button combination to unlock the device. The button combination is button 3 -> button 4 and is displayed with the LEDs under the buttons.
My Last Broadcast
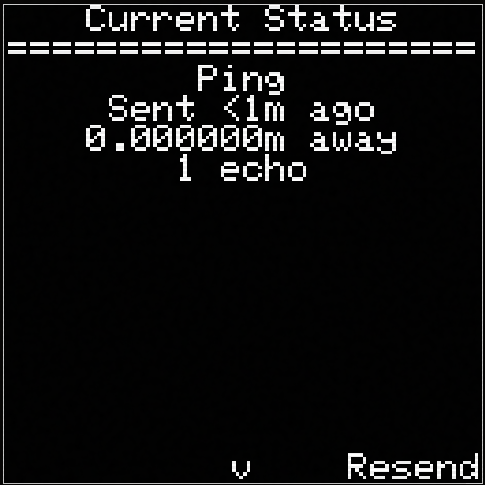
Scrolling up displays your last broadcast. You can see the message attached to it, how far away it was, how long ago it was sent, and how many times the message echoed back to you from other users. Selecting resend will enter a state where the message is resent periodically with updated time and location.
Received Messages
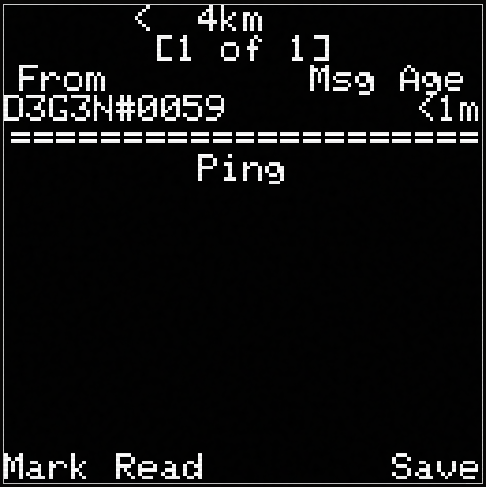
Scrolling down from the Home Window will display messages received from other users. The compass ring will point towards the coordinates attached to the message and you can see your distance away at the top. From here, you can save the message or the location attached to the ping. Pressing “Mark Read” will clear the message from your Home Window.
Main Menu
Accessed from the Home Window, the Main Menu holds configuration, diagnostics, and device-level actions.
| Item | Purpose |
|---|---|
| Settings | General device settings. See Settings Reference for more info |
| Configure via WiFi | Spins up a WiFi AP so the companion app can connect and change settings. |
| Configure via BT | Same as above, over BLE pairing instead of WiFi. |
| Status Messages | Create, edit, and delete the saved status messages offered when broadcasting. |
| Saved Locations | Create, edit, and delete saved locations offered when broadcasting. |
| Debug Compass | Live compass readings for troubleshooting. You can also calibrate the compass here |
| Debug Geolocation | Read, enable, and disable your geolocation sources. See Geolocation Sources for what each one does |
| Diagnostic Info | Memory diagnosics |
| Breakout | Breakout game |
| Reboot | Restarts the device. |
| Shutdown | Powers the device off. |
Configuration App
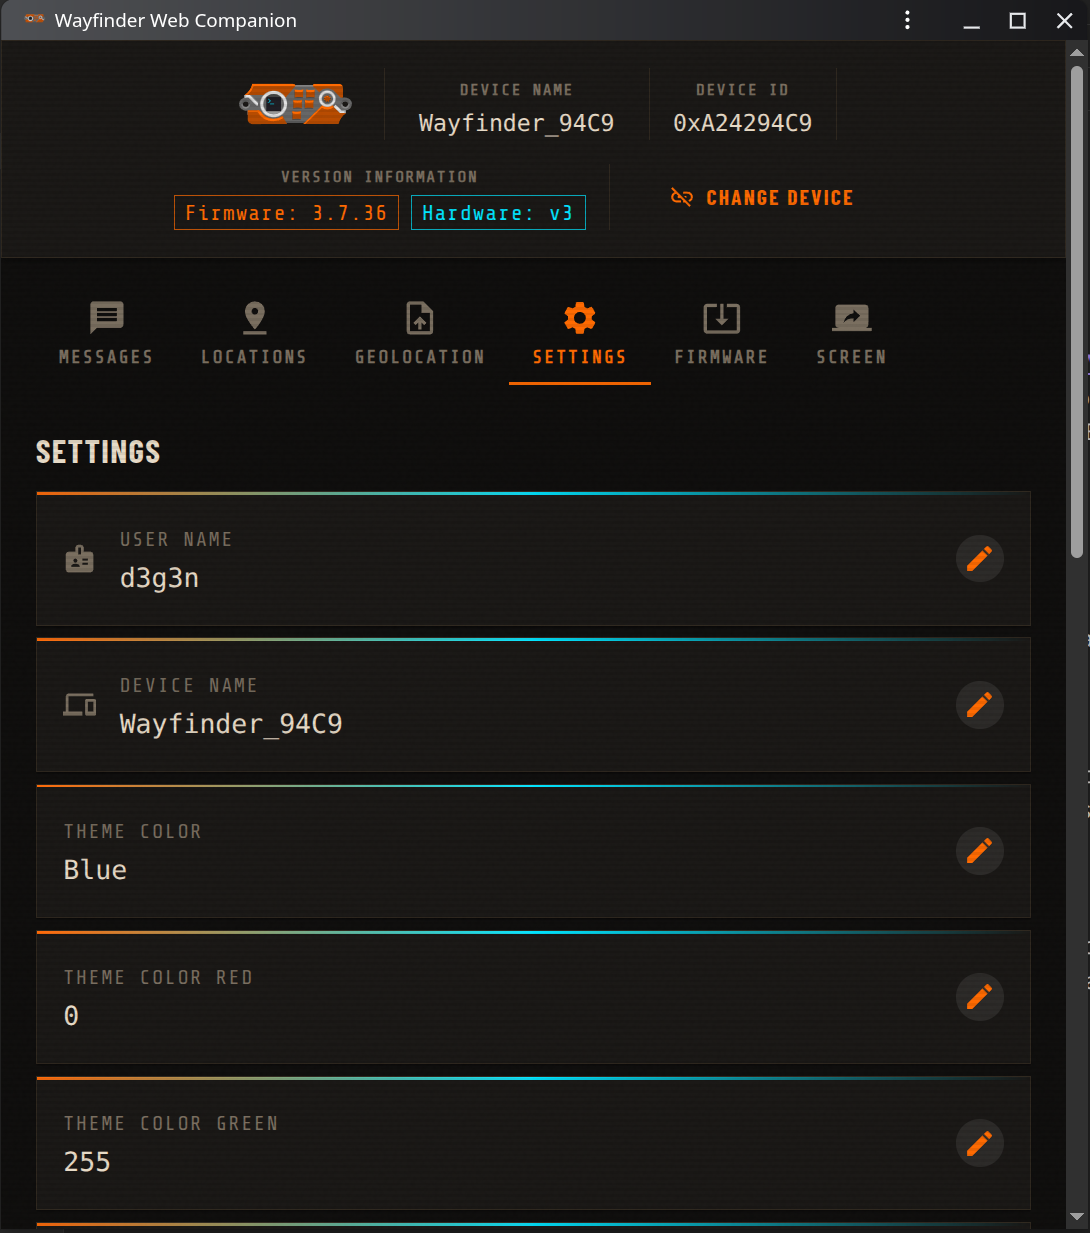
The Wayfinder includes a Progressive Web App (PWA) to make initial configuration easier. This app can be accessed at Wayfinder.WyrdWyrks.com on any chrome-based browser and downloaded to most devices for offline use. Due to the built-in RPC protocol, the PWA can connect to the Wayfinder over USB-C Serial (recommended), BLE, and WiFi (not recommended).
Messages
Create, update, and delete saved messages that can be selected with any ping.
Locations
Create, update, and delete saved locations that can be selected with any ping. A map displays all of your saved coordinates and assists with selection of new coordinates.
Geolocation
The Geolocation tab allows you to upload coordinates of WiFi access points to assist in WiFi-based geolocation when GPS fails. A pre-populated JSON file of AP information for the LVCC is included and can be downloaded for editing. The PWA caches recently uploaded databases to easily switch between.
Settings
Edit on-device settings.
Firmware
View currently installed firmware and a list of releases available for install.
Screen
Serial connection only. Emulates the OLED screen and allows for input emulated from the PWA.
Appendix
LoRa: Channels & Passwords
Two independent settings control who your badge can talk to: LoRa Channel and Channel Key. They’re unrelated — channel is which frequency your radio is tuned to, key is who among the people on that frequency can actually read your messages.
Channel — which frequency you’re on
The LoRa Channel setting picks one of 8 frequencies in the 902–928 MHz band, spaced 1.5 MHz apart:
| Channel | Frequency |
|---|---|
| 1 | 904.5 MHz |
| 2 | 906.0 MHz |
| 3 | 907.5 MHz |
| 4 | 909.0 MHz |
| 5 | 910.5 MHz |
| 6 | 912.0 MHz |
| 7 | 913.5 MHz |
| 8 | 915.0 MHz (default) |
This is a radio-level split, not a software filter — badges on different channels can’t hear each other’s transmissions at all, the same way two walkie-talkies on different channels can’t. Channel 8 is the default so a badge fresh out of the box can always talk to another fresh badge.
Channel Key — which chatroom you’re in
The Channel Key setting (labeled “password” in spirit, up to 21 characters) controls encryption for everyone sharing a channel:
- Empty key → plaintext. Every message you send is readable by any badge on your channel, and you can read theirs. This is the default.
- Any non-empty key → encrypted. Your badge and every other badge using the exact same key string can read each other’s messages. Badges using a different key — or no key — cannot decrypt them at all, even though they’re on the same channel and physically receive the same radio packets.
Think of a non-empty key as naming a private chat room layered on top of the shared channel. It isn’t a personal password protecting your badge; it’s a shared secret that anyone can be given to be let into the room. Everyone who knows the string reads every message in that room — there’s no per-person access within it.
Under the hood, your key string is stretched into an AES-128 encryption key (PBKDF2-HMAC-SHA256, 10,000 iterations), and every message is encrypted with AES-128-CBC using a fresh random IV. Two badges with the same key string always derive the same encryption key, which is what lets them read each other.
How they interact
Every badge relays every message it hears on its channel toward the edge of the mesh, regardless of whether it can decrypt that message — routing information (sender, message ID, hop count) is never encrypted, only the message content is. So a badge sitting outside your chat room still helps carry your encrypted traffic further; it just can’t read what it’s carrying.
If a message doesn’t decrypt — wrong key, or no key against an encrypted message, or a key against a plaintext one — it simply never appears on your Home Window. There’s no error, no notification that a private message passed through; it’s indistinguishable from mesh noise.
Geolocation Sources
Three independent sources can supply your badge’s location. They’re queried in priority order — GPS, then WiFi, then Static — and the first one to report a fix wins. Each can be enabled or disabled independently from the Main Menu’s Debug Geolocation screen.
GPS
The primary source, and the only one that also sets the clock. It’s a satellite fix from the onboard GPS module. Like any GPS, it needs a clear-ish view of the sky and can take a while to get a first fix.
WiFi
Falls back in when GPS can’t get a fix — indoors, or in a crowded convention hall, the kind of “urban canyon” GPS struggles with.
It scans nearby WiFi access points and looks each one up in an on-device database of surveyed AP coordinates. Matched APs are weighted by signal strength — a stronger RSSI implies the AP is closer — and averaged into a position estimate. Accuracy is coarse, ~30 meters, but it works where GPS can’t.
This only finds access points already in the badge’s database — see Configuration App → Geolocation for uploading one. WyrdWyrks ships a database pre-populated for the convention venue.
Static
A fixed coordinate with no sensor involved — the last-resort fallback when neither GPS nor WiFi produce a fix. Set it from the Static Lat / Static Lon settings under Settings Reference → Navigation; useful as a known-good location for testing, or as a deliberate fallback if you’d rather the badge report a fixed point than nothing at all when the other sources are out of range. This source is disabled by default.
How they interact
Every enabled source is polled automatically in the background every 15
seconds, and a fix is considered good for 60 seconds before it’s treated as
stale. GetCurrentLocation() — everything on the badge that needs “where am
I,” including distance/bearing to a ping — returns the freshest fix from the
highest-priority enabled source, GPS first.
Disabling a source from the Debug Geolocation screen (Button 4) is useful for testing: disabling GPS, for instance, forces the badge onto WiFi or Static even under a clear sky, showing you what a user without a GPS fix sees. Scroll between sources with the encoder; Button 1 forces an immediate refresh of whichever source is on screen.
Settings Reference
Reached from Main Menu → Settings. Every setting is saved to the device immediately and survives reboot and firmware updates.
Identity
| Setting | Default | Notes |
|---|---|---|
| User Name | User |
Up to 12 characters. Attached to messages you broadcast so recipients know who sent them. |
| Device Name | Wayfinder_XXXX, unique per device |
Up to 20 characters. What the companion app sees when scanning for your badge over WiFi or Bluetooth. |
Appearance
| Setting | Default | Notes |
|---|---|---|
| Theme Color | Green | One of Custom, Red, Green, Blue, Purple, Yellow, Cyan, White, Orange. Choosing Custom switches the UI accent to the RGB values below. |
| Theme Color Red | 0 | 0–255. Custom accent color, red channel. |
| Theme Color Green | 255 | 0–255. Custom accent color, green channel. |
| Theme Color Blue | 0 | 0–255. Custom accent color, blue channel. |
Clock
| Setting | Default | Notes |
|---|---|---|
| 24H Time | Off | Switches the clock between 12-hour and 24-hour display. |
| Timezone | US/Eastern | One of 16 preset zones covering the US, Europe, and Asia/Pacific. |
Notifications
| Setting | Default | Notes |
|---|---|---|
| Silent Mode | Off | Same toggle as the quick action menu. Mutes the buzzer and haptics on incoming messages. |
LoRa
See LoRa: Channels & Passwords for what these actually do.
| Setting | Default | Notes |
|---|---|---|
| Channel Key | (empty) | Up to 21 characters. Empty = plaintext; any value = encrypted. |
| LoRa Channel | 8 - 915.0 MHz |
One of 8 channels, 904.5–915.0 MHz. |
| Num Broadcasts | 3 | 1–5. How many times your own outgoing broadcasts are repeated on the air, with a randomized delay between each, to improve the odds a distant badge catches at least one copy. |
WiFi
| Setting | Default | Notes |
|---|---|---|
| WiFi Mode | Off | Off, AP Mode, or Station Mode. Controls how Configure via WiFi connects. |
| WiFi AP Password | esp-XXXX |
Up to 21 characters. Password for the hotspot the badge creates in AP Mode. Last 4 characters are randomized on first boot. |
Navigation
| Setting | Default | Notes |
|---|---|---|
| Static Lat | 33.7490 | Latitude used for emulating a static location. |
| Static Lon | -84.3880 | Longitude used for emulating a static location. |